
ProPresenter · November 7, 2026
How to Install the ProPresenter Quick Start Template in ProPresenter 22 (and Bring Your Songs With You)
ProPresenter 22 stores your setup in a database, not a folder. Here's how to import the Quick Start Template as a workspace, then bring in your songs, themes, playlist templates and media.
If you’ve installed the ProPresenter Quick Start Template before, you know the old routine: swap in the template folder, copy your songs over in Finder, open ProPresenter, done. ProPresenter 22 changed that. Your songs, playlists, macros and stage layouts no longer live as files you can copy and paste.
The template still works in 22. You just install it a different way, and you bring your own content in through ProPresenter instead of through Finder. Here’s the whole process, step by step.
What Changed in ProPresenter 22
ProPresenter used to keep everything in a folder you could open: a Libraries folder full of song files, a Playlists folder, a Media folder and so on. Version 22 keeps your presentations, playlists, macros, looks and stage layouts inside its own database instead.
Three things follow from that:
- The template comes in as its own workspace. You import it once, and ProPresenter copies everything inside. After that, it doesn’t need the downloaded folder.
- Your songs travel as export files. You export them from your old workspace and import them into the template’s workspace.
- “Open in Finder” is gone from Manage Workspaces, and so is right-clicking a presentation to find its file. There’s no file to find anymore.
Your current setup is never touched. The template becomes a new, separate workspace. Your existing workspace stays exactly as it is, and you can switch back to it anytime.
Step 1: Import the Template as a New Workspace
After you buy the template, you get an email with a download link. Unzip it to get the template folder.
- Open ProPresenter’s Settings and go to the General tab.
- Click Manage Workspaces.
- Click + and choose Import Legacy ProPresenter Folder…
- Select the template folder (the one with Configuration, Libraries, Media and Themes inside it) and click Import.
It’s fine to import straight from your Downloads folder. In version 22, ProPresenter copies the template into its own storage, so the downloaded folder isn’t needed afterward. Keep it somewhere safe anyway, as your backup.
If you see “The workspace you are trying to import already exists,” the template is already installed. Switch to it in Manage Workspaces instead of importing it again.
Assign Your Screens
The template brings our screen and multiview setup, stage display layouts, looks and macros. Your projectors, TVs and stream computer are your own, though. Open Screens → Configure Screens and point each output at your hardware. Our screen setup guide walks through it.
Step 2: Bring Over Your Songs (One Library at a Time)
This is where your songs come across, along with the backgrounds and media on their slides.
Before you export, connect any external drives that hold your media. ProPresenter packs each song’s media into the export file, but only if it can reach the file at that moment. A drive that isn’t plugged in means a missing background later.
- In Settings → General, switch to your old workspace.
- Click a library, click any presentation in it, and press ⌘A (Ctrl+A on Windows) to select everything.
- Right-click and choose Export Bundle. Keep “Include media within presentations” turned on, and save the file somewhere easy to find.
- Switch to the Quick Start Template workspace.
- Select the library you want the songs in, then choose File → Import → File… and pick the bundle.
Songs land in whichever library is selected, so pick the library first.
Have more than one library? Export each library as its own bundle, and import each one separately with the matching library selected. Honestly, most churches only need one library, so this is a good moment to combine them.
Import each bundle once. Bringing the same songs in a second time gives you duplicate copies.
Step 3: Bring Over Your Themes (Optional)
If you’ve built your own themes, they can sit right alongside the template’s.
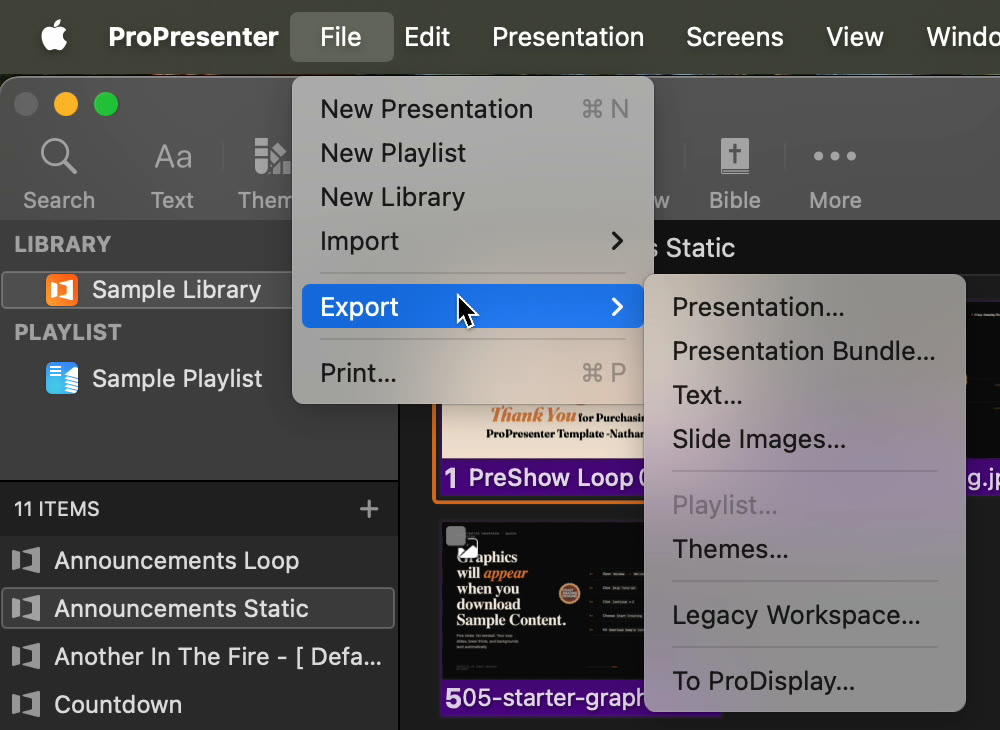
- In your old workspace, choose File → Export → Themes…
- Check the themes you want to keep and uncheck the rest.
- Save the file. It ends in .protheme.
- Switch to the Quick Start Template workspace, choose File → Import → File… and pick the .protheme file.
Step 4: Bring Over a Playlist Template (Optional)
The template already comes with sample playlists. If your church has its own playlist template, the order of service you rebuild every week, you can bring that too. Do it this way, though, or you’ll double your library.
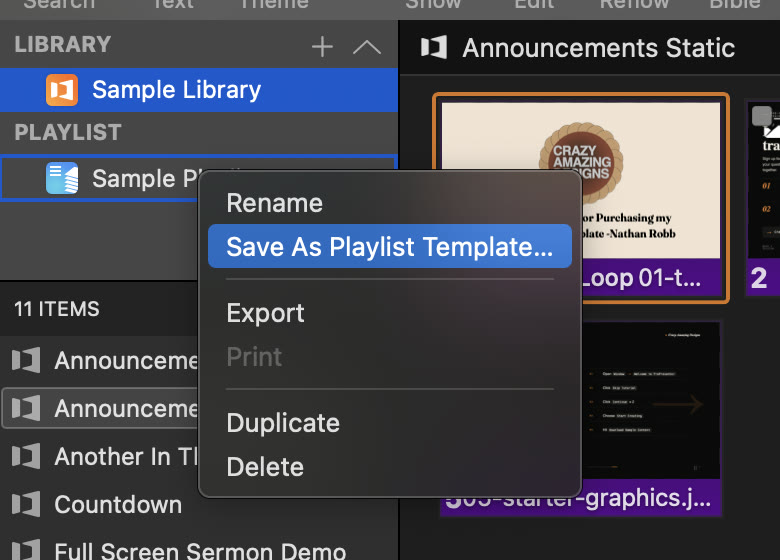
- In your old workspace, right-click the playlist and choose Save As Playlist Template…
- Keep only the headers and placeholder items. Take the songs and presentations out.
- Export that version, switch to the Quick Start Template workspace, and bring it in with File → Import → File…
Why this matters: an exported playlist carries its own copy of every song and presentation in it. Your songs already came over in Step 2, so you’d end up with duplicates marked -1, like “Way Maker” and “Way Maker-1.” The playlist would point at the -1 copies, too.
For the same reason, don’t bring over last Sunday’s service or last year’s VBS playlist. Build new services from your library inside the template.
Step 5: Bring Over the Rest of Your Media
Your songs’ backgrounds already came across in Step 2. This step is for everything else in your Media bin, like announcement graphics, countdown videos and backgrounds you haven’t put on a slide yet.
Where your media is
By default, ProPresenter copies every file you drag into it into that workspace’s media folder. So almost everything you’ve ever used sits in one folder, and we can bring it all across at once.
Because Open in Finder is gone in version 22, the template includes a small Mac helper called Open ProPresenter Media Folder. Double-click it, pick your old workspace from the list, and its media folder opens in Finder. It lists every workspace on the computer by name and changes nothing.
Drag it in
- In the Quick Start Template workspace, open the Media bin and create a new playlist. We call ours Our Church Media.
- Use the helper to open your old workspace’s media folder.
- Select everything in that folder and drag it onto the Our Church Media playlist.
It’s safe to drag in everything. Files that already came over with your songs aren’t copied a second time. If one of your files has the same name as a template file, like a Background.jpg, nothing gets replaced: yours comes in as Background-1.jpg.
The folder doesn’t remember your old media playlists, so everything lands in one playlist. If you want it organized, make more playlists in the Media bin and drag items into them.
Only drag files into ProPresenter. Don’t add, move or rename anything inside the folder the helper opens. ProPresenter manages that folder and won’t see changes made there.
If you ever turned off ProPresenter’s media management
If you’ve ever turned off ProPresenter’s setting to manage your media, some of your files were never copied into that folder. They’re still wherever they were on your computer, on your desktop, in Documents or on an external drive. You can still bring them in: drag them from those locations into playlists in the Media bin.
On Windows, the helper isn’t available, so drag your media in from wherever you keep it.
Step 6: Check Your Work
Run a mock service before anyone depends on it.
- Open a few of your songs and look at the first slide. The backgrounds you always use should be there.
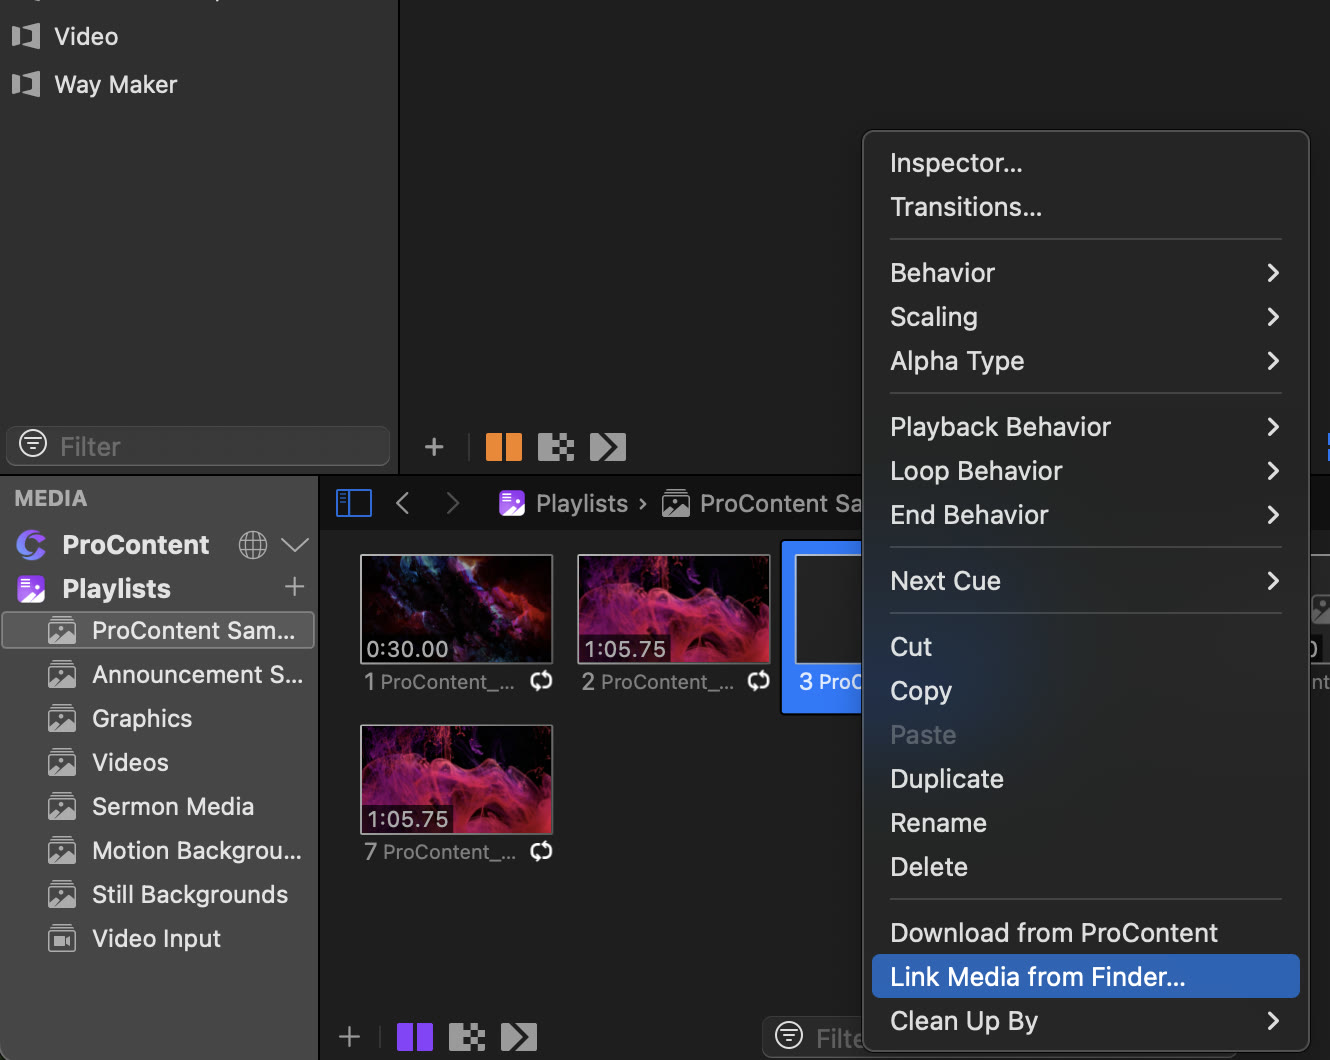
- Missing a background? Right-click the slide or media item and choose Link Media from Finder…, then point it at the file.
- Fire the template’s macros and watch the multiview. Lyrics should land on the main screen while the stream gets lower thirds.
- Add the template’s first-slide macro to your songs. The worship look is triggered by a macro on each song’s first slide, so your imported songs need it too.
- Check the stage display on your stage screen.
Make It Yours: Your Logo and Stage Macros
A few of the template’s macros are worth knowing before Sunday.
- Clear to Logo clears the screen and shows the logo from the Logo prop collection. Out of the box, that’s our logo. Open the props, replace it with your church’s logo, and the macro shows yours from then on.
- Stage Only sends what you fire to the stage screen alone, so the band can see something the room doesn’t.
- Stage + Audience sends it to the stage screen and the audience screens together.
- Sermon notes and scripture each come as a full-screen layout and a lower third. The lower thirds come in a chroma (green) version and an alpha (transparent) version, so use whichever your stream setup keys.
- The animated stickers in the Announcements Loop and Announcements Static need ProPresenter 22 or later. On earlier versions, they won’t play.
- Your stream gets lyrics over green. The worship and sermon looks send the room a full-screen slide and send the stream output a lower third over a green background, so one HDMI cable into your switcher is enough: key out the green and the words sit on your camera shot. If your setup can key alpha (key and fill, or NDI with alpha), open Looks, pick the look, and switch the stream screen’s theme to the Alpha version of the same layout. It’s already in the template.
- More lyric layouts. Worship Themes has lyric layouts with a black box or bar behind the words, both full slide and lower third, with no backgrounds built in. Apply one to a song to change its look on top of your own motion backgrounds.
What Doesn’t Come Across
Macros, looks, stage layouts and props can’t be exported one at a time, so the template workspace has ours and your old ones stay in your old workspace. For most churches, that’s the point: you’re trading a pile of one-off macros for a set that works together.
If there are a few of your own you can’t live without, rebuild them in the template. Switch between the two workspaces to copy the settings over.
Installing on Other ProPresenter Versions
Not on 22 yet? Here’s what to do on each version. To check yours, open the ProPresenter menu and choose About ProPresenter.
ProPresenter 7.1 to 7.19 (no Workspaces)
ProPresenter opens whatever is in the folder named ProPresenter in your Documents folder.
- Quit ProPresenter.
- In Documents, rename your current ProPresenter folder to ProPresenter old.
- Rename the unzipped template folder to just ProPresenter and drag it into Documents.
- Open ProPresenter.
To bring your songs along, quit ProPresenter and copy your libraries from ProPresenter old/Libraries into the template’s Libraries folder in Finder. The full walkthrough is in What’s Inside the Quick Start Template and How to Install It.
ProPresenter 20 and 21 (7.20 and later, with Workspaces)
- First, move the template folder somewhere permanent, like Documents. On these versions, the workspace keeps running from the folder you imported, so a template imported from Downloads stays in Downloads.
- Go to Settings → General → Manage Workspaces, click +, choose Import Legacy ProPresenter Folder…, and select the template folder.
- To bring your songs along, use Open in Finder in Manage Workspaces to open both workspace folders, and copy your libraries into the template’s Libraries folder.
The full install article has the step-by-step version.
Upgrading to 22 With the Template Already Installed
You don’t need to reinstall. The first time ProPresenter 22 opens, it upgrades your existing workspaces, the template included. If anything can’t be upgraded, ProPresenter lists those items and leaves your previous workspace unchanged.
ProPresenter 22 and Later
Follow the steps at the top of this article.
Stuck?
If something doesn’t look right, book a session. You share your screen with ProPresenter open, and we get the template running with your songs in it.
Don’t have the template yet? Get the ProPresenter Quick Start Template.
Filed under: ProPresenter 22 · ProPresenter Template · ProPresenter Workspaces · Import Legacy ProPresenter Folder · ProPresenter Bundle · ProPresenter Media